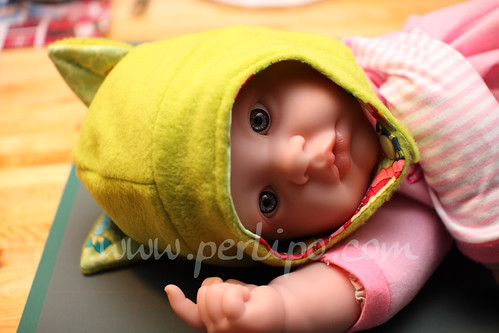
Dans ma quête de cadeaux de noël cette année, je me suis mise en tête de faire un bonnet chat pour l’une de nos petite nièce. Ne pouvant consacrer trop de temps sur chacun des cadeaux (nous avions décidé de faire tous nos cadeaux cette année, je vous en dirai plus dans un autre billet), je me suis mise à la recherche de patrons et c’est là que je suis tombée sur ce billet. Après avoir vu ce bonnet, impossible de me le sortir de la tête et bien que le patron n’était plus disponible il me le fallait. Je me suis donc mise à développer un patron que je vous propose en libre téléchargement pour une utilisation personnelle. Vous trouverez toutes les tailles nécessaires pour faire des bonnets entre la taille naissance et l’adolescence (taille 56). Si vous prenez le temps de le faire, venez me montrer vos créations, ici ou sur ma page Facebook !
In my quest of finding some Christmas presents this year, I decided I wanted to make a cat hat for one of our little niece. Since I couldn’t spend too much time on each of the present (we decided to make all our presents this year, I’ll tell you more in a different blog post), I started to look for some ready-made patterns and this is how I discovered this blog post. After seeing this hat, I just couldn’t get it out of my head and even though the pattern wasn’t available anymore, I wanted it. So here I was developing the pattern that I offer you for free as long as it is for personal use. You will find all the sizes from newborn to teenager (size 56cm/22inch). If you take the time to make it, come around and show me your creations, here or on my Facebook page!
Pour télécharger le patron en format A4 (français/english) c’est par ici : A4 Patron Bonnet Chat
To download the pattern in the Letter format (français/english), click here : Letter Pattern Cat Hat

Tuto :
Il vous faut :
- entre 25cm et 40cm de tissu chaud pour l’éxtérieur (polaire, pilou, minky…)
- entre 25cm et 40cm de coton pour la doublure
Facultatif – Des pressions KAM ou un bouton ou du scratch…
You will need:
- between 10" and 15" of warm fabric for the outside (fleece, flanelle, minky…)
- between 10" and 15" of cotton fabric for the lining
Optional – Some KAM fasteners or a button or some applix…
Couper :
Ces patrons ne comprennent pas de marges de couture pour que ce soit plus simple de s’y retrouver avec toutes les tailles, je vous invite donc à rajouter 1cm tout autour de chacune des pièces lorsque vous découpez vos morceaux.
- 4 fois la partie couronne dans le tissu extérieur et 4 fois dans le tissu intérieur
- 1 fois la partie cache-oreille en pliant le tissu comme indiqué sur le patron dans le tissu extérieu et faire de même avec le tissu intérieur
- 2 oreilles dans le tissu extérieur, 2 oreilles dans le tissu intérieur
Cut:
These patterns do not include seam allowances in order to find more quickly all the different sizes. Therefore you will need to add 3/8 of an inch all around the pattern pieces when you cut your fabrics.
- 4 times the crown piece in the outside fabric and 4 times in the inside fabric
- Once the earmuffs piece, folding the fabric as indicated on the pattern and do the same with the inside fabric
- 2 ears in the outside fabric, 2 ears in the inside fabric
Et maintenant l’assemblage
And now the sewing:

Plier les oreilles en deux et fermer leurs pinces
Fold the ears in half and close down their darts

Assembler, endroit contre endroit, les deux parties des oreilles (tissu intérieur et tissu extérieur) et coudre les deux côtés sans pinces à 1cm du bord.
Put together, right side onto right side, both parts of the ears (outside and inside fabrics) and sew at 3/8" from the edge both sides that have no darts.

Raboter l’angle du haut de l’oreille avec des ciseaux.
Trim off the excess in the top angle of the ear.

Prendre deux des morceaux "couronne" dans le tissu extérieur et les assembler, endroit contre endroit, à 1cm du bord, le long d’une des montées en prenant soin de ne commencer la couture qu’à 1cm du haut.
Take two pieces of the outside fabric crown, place them right side onto right side, and sew one of the longest side, starting at 3/8" from the top, at 3/8" from the edge.

Placer une des oreilles (ici à 3cm du haut), sur l’un des montants extérieur et non cousu de la couronne, l’épingler doublure vers l’endroit du tissu de la couronne et la coudre en place au raz du bord. Faire de même avec la deuxième oreille de l’autre côté des deux morceaux de la couronne.
Place one of the ear (here at just over an inch from the top) on one of the unsewn crown sides previously put together, pin it down making sure the lining is facing down the right side of the crown and sew it down right by the edge. Do the same with the second ear on the other side of the two pieces crown.

Assembler les deux morceaux supplémentaires de la couronne, un par un, de la même manière que les deux premiers puis fermer la couronne en cousant les deux parties extérieures encore une fois à 1cm du bord en commençant à 1cm du haut.
Put together the two more pieces of the crown, one by one, using the same method as for the two others and then close down the crown by again sewing the outside parts remaining opened at 3/8" from the edge and starting at 3/8" from the top of the hat.

En ne vous préoccupant pas des oreilles, reproduire l’assemblage de la couronne de la doublure.
Without worrying about the ears, reproduce the same construction for the lining crown.

Raboter toutes les coutures de la couronne (tissus extérieur et intérieur) à environ 5mm.
Trim off all the crown seams (on both the outside and inside fabrics) to about 1/4".
Fermer les morceaux cache oreille en les cousant le long de leurs dos, endroit contre endroit, à 1cm du bord. Repasser ces coutures ouvertes.
Close down the earmuffs parts by sewing their back together, right side onto right side, at 3/8". Iron down these seam opened.
En faisant correspondre chacune des marques de la partie cache oreilles avec les coutures de la couronne, assembler les deux morceaux à 1cm du bord.
Making sure to match all the notches from the earmuffs patterns with the crown seams, stitch down the two together at 3/8" from the edge.

Insérer l’un des chapeaux dans l’autre, endroit contre endroit, faire correspondre les coutures et milieux avant et épingler tout autour avant de les coudre à 1cm du bord en laissant une ouverture d’environ 8cm au milieu de l’avant du bonnet. Raboter les arrondis des oreilles et faire des entailles dans les parties arrondies
Insert one hat into the other one, right side onto right side, matching the seams as well as the middle front notches and pin them down together. Sew them together all around at 3/8" from the edge, leaving an unsewn opening of about 3" in the middle front of the hat. Trim off the curves of the ears and make notches inside the other curves.

Retourner, aplatir et repasser cette couture. Epingler fermée l’ouverture jusqu’à présent restée ouverte.
Turn around the hat, flatten and iron down this seam. Pin down the opening used to turn around the hat.

Surpiquer tout autour du bord du chapeau en prenant soin de bien fermer l’ouverture.
Topstitch all around the edge of the hat making sure to close down the unsewn hole.
Si désiré, placer une pression ou boutonnière sur les "pattes" du bonnet pour pouvoir le fermer sous le menton.
If wanted, make a buttonhole or put a KAM fastening on the "sideburns" of the hat in order to be able to close it under the chin.

Voilà !

